
Agent Observability
Learn about Agent Observability in Parseable, including core concepts, configuration steps, and practical guidance for building an effective observability…
Agents are already becoming part of everyday software. Sometimes users work with them directly. Sometimes they sit behind a workflow and quietly make decisions on their own. In both cases, a single request can quickly turn into multiple model calls, tool calls, retries, and intermediate steps before the final answer shows up.
That is usually where debugging gets hard. When the final answer is wrong, slow, or incomplete, the answer itself is not enough. You need to see the full run: what prompt started it, which model was used, what tools were called, what each tool received, what came back, how many tokens were spent, and where the run started to drift. That is the job of Agent Observability.
Agent observability with Parseable
Parseable Agent Observability gives you that view inside Prism. You can begin with a high-level view of agent activity, look at model and tool behavior separately, and then move into a single agent run when you need the full execution path.
It is built on the OpenTelemetry GenAI semantic conventions, so the telemetry follows a standard shape for model calls, token usage, inputs, outputs, tool calls, and agent spans. For message content, Parseable follows the native GenAI model: use gen_ai.input.messages, gen_ai.output.messages, gen_ai.system_instructions, and the gen_ai.client.inference.operation.details event when you capture full request and response details.
Parseable is not tied to one agent framework. Any supported framework or instrumentation path that sends compatible OpenTelemetry trace data can feed Agent Observability. Use the framework-specific guides when you want setup instructions for a particular stack.
Once your agent is instrumented, the Agents page becomes the place where you understand how that agent behaves in production. You can see how often it runs, which models it uses, how many tokens it consumes, where it spends time, which tools it calls, and where a run needs review.
Explore agent activity
The Agents page is organized around four tabs: Overview, Models, Tools, and Agent Runs. The dataset selector at the top lets you choose the traces dataset you want to inspect, while the time range picker controls the window used by every chart and table on the page.
Overview
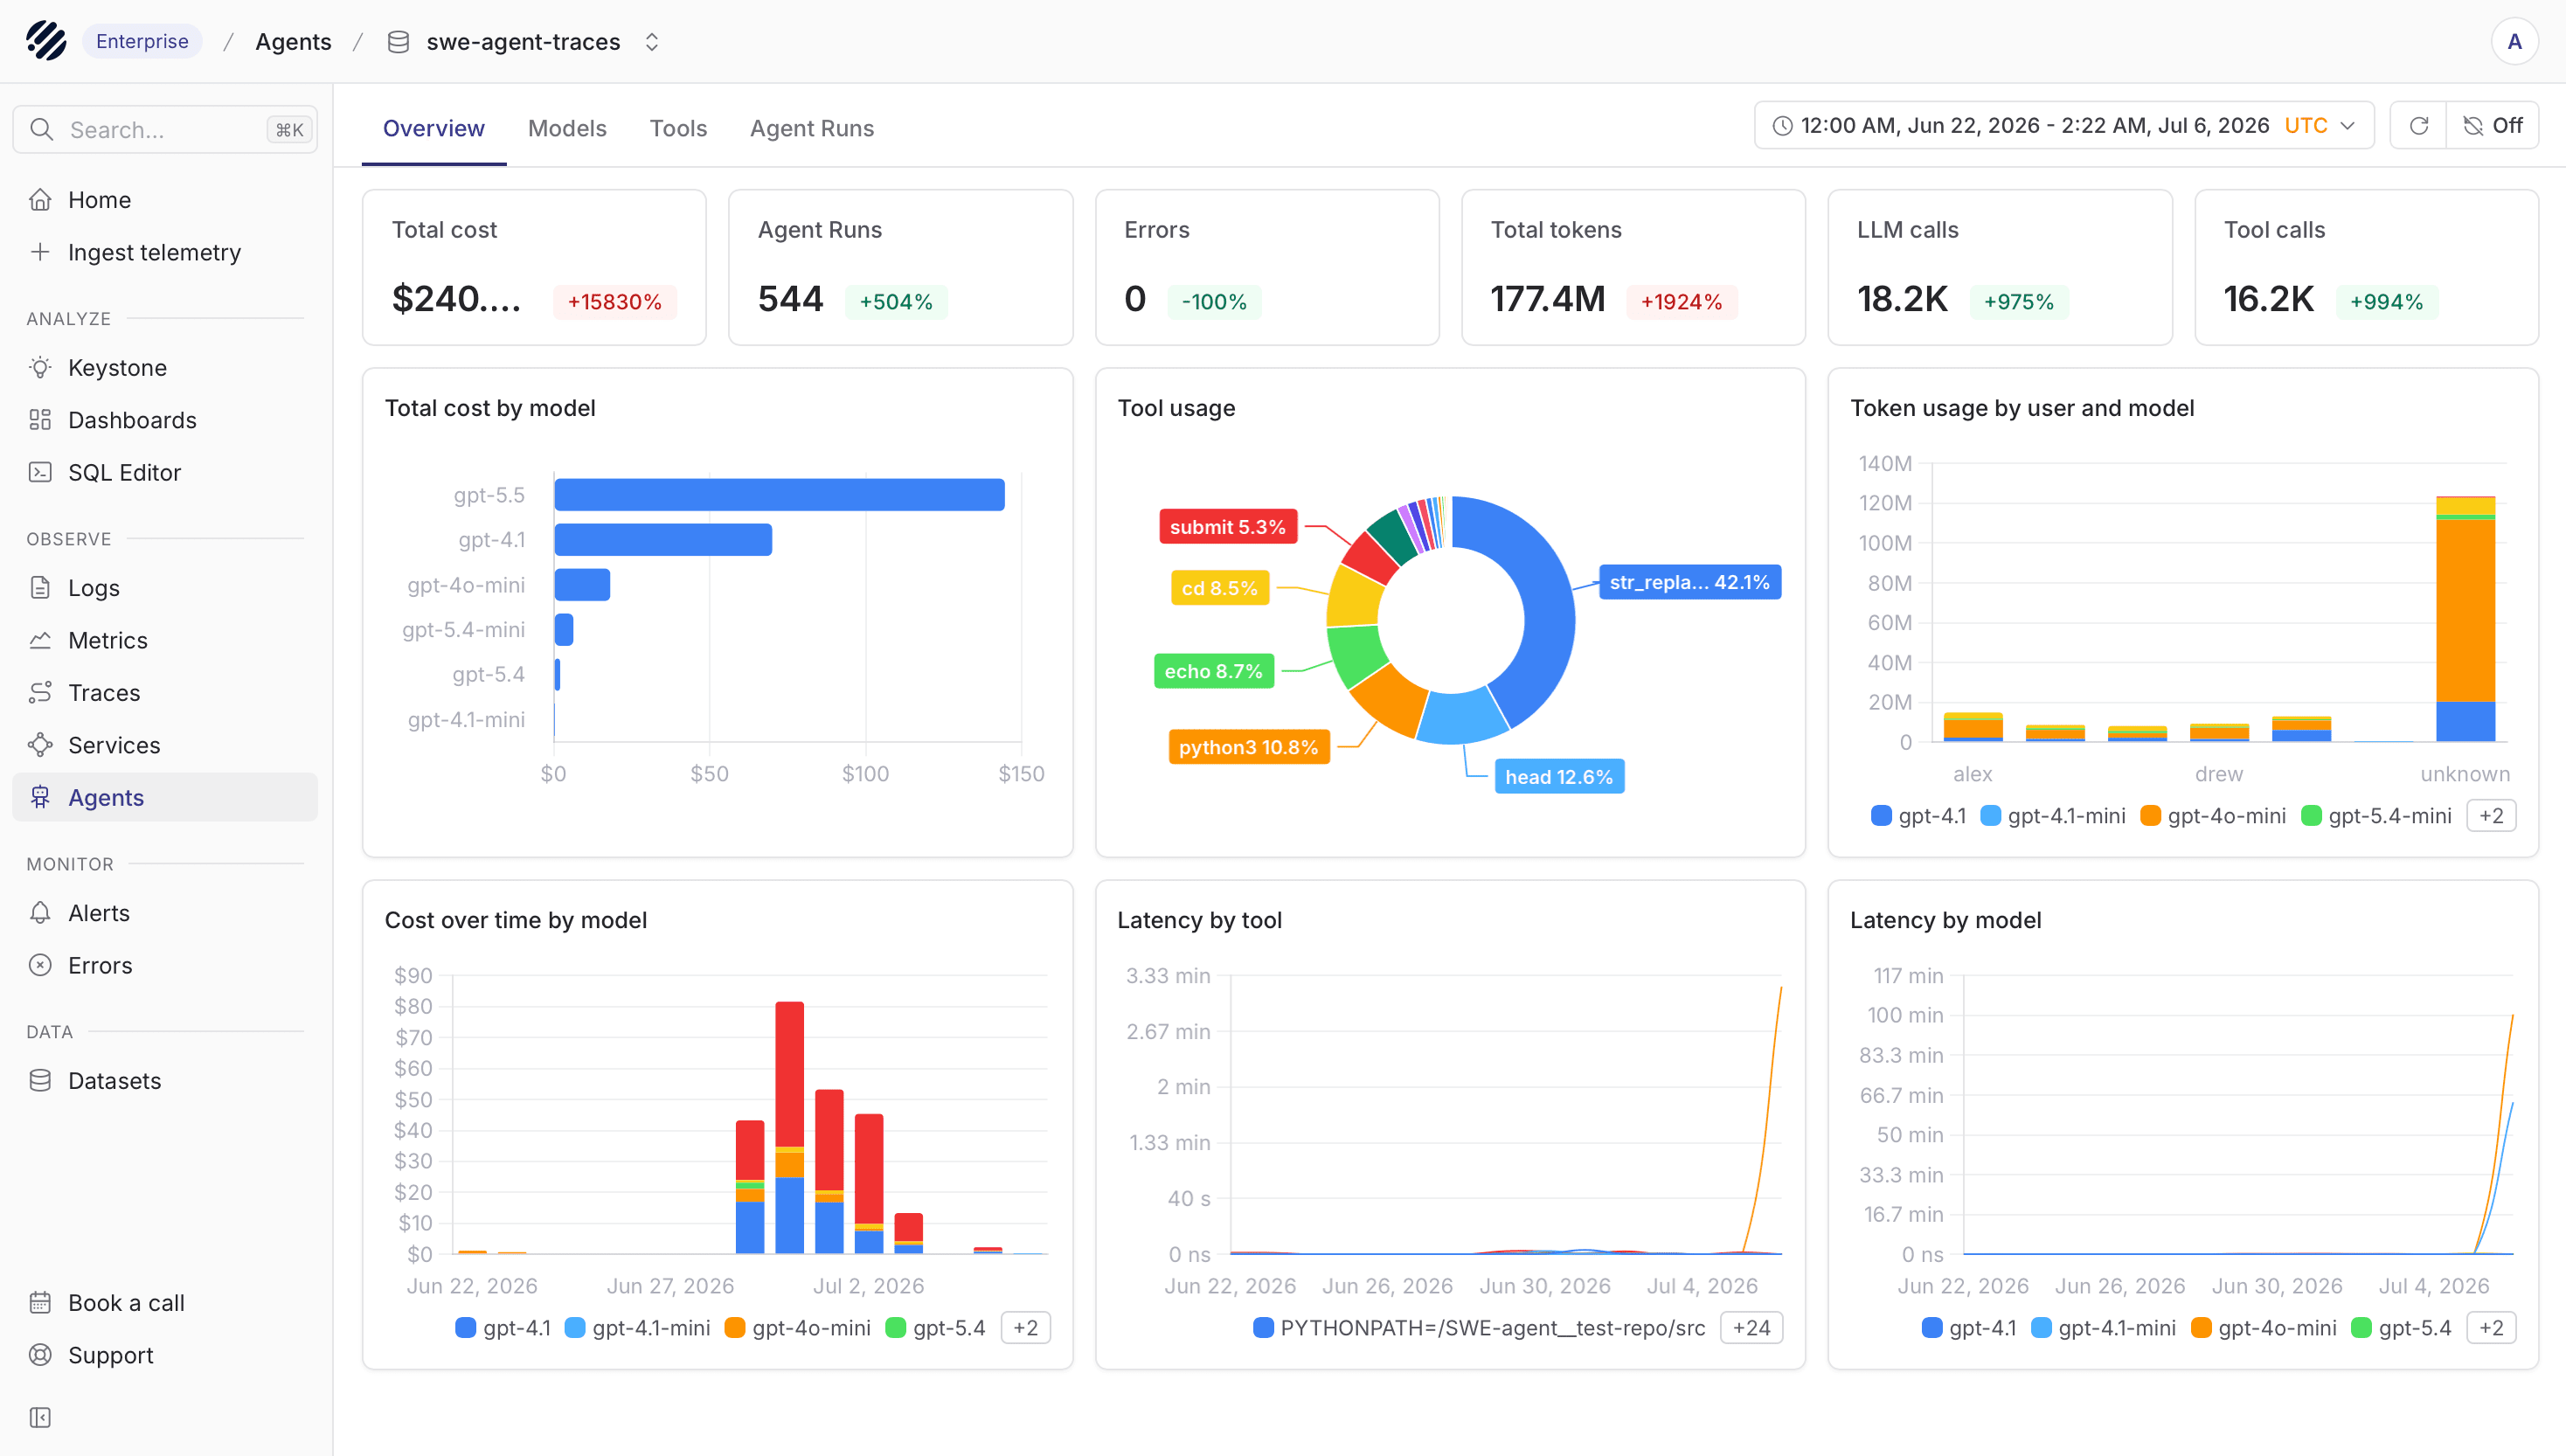
Start with the Overview tab when you want to understand the shape of agent activity before going deeper. It gives you the main health and usage signals in one place.
The summary cards show total cost, agent runs, errors, total tokens, LLM calls, and tool calls for the selected period. These are useful first checks. You can quickly see whether usage increased, whether errors appeared, and whether the growth is coming from more agent runs, more model calls, more tool calls, or heavier token usage.
Below the summary, the charts break the run down by model, tool, user, and time. Total cost by model shows which model is driving spend. Tool usage shows which tools are being called most often. Token usage by user and model helps you see who or what is consuming tokens. Cost over time, latency by tool, and latency by model help you spot spikes that are easier to miss in a table.
Use the time range picker in the top-right corner when you want to move from a broad view to a smaller investigation window. The whole page follows that selected range.
Models
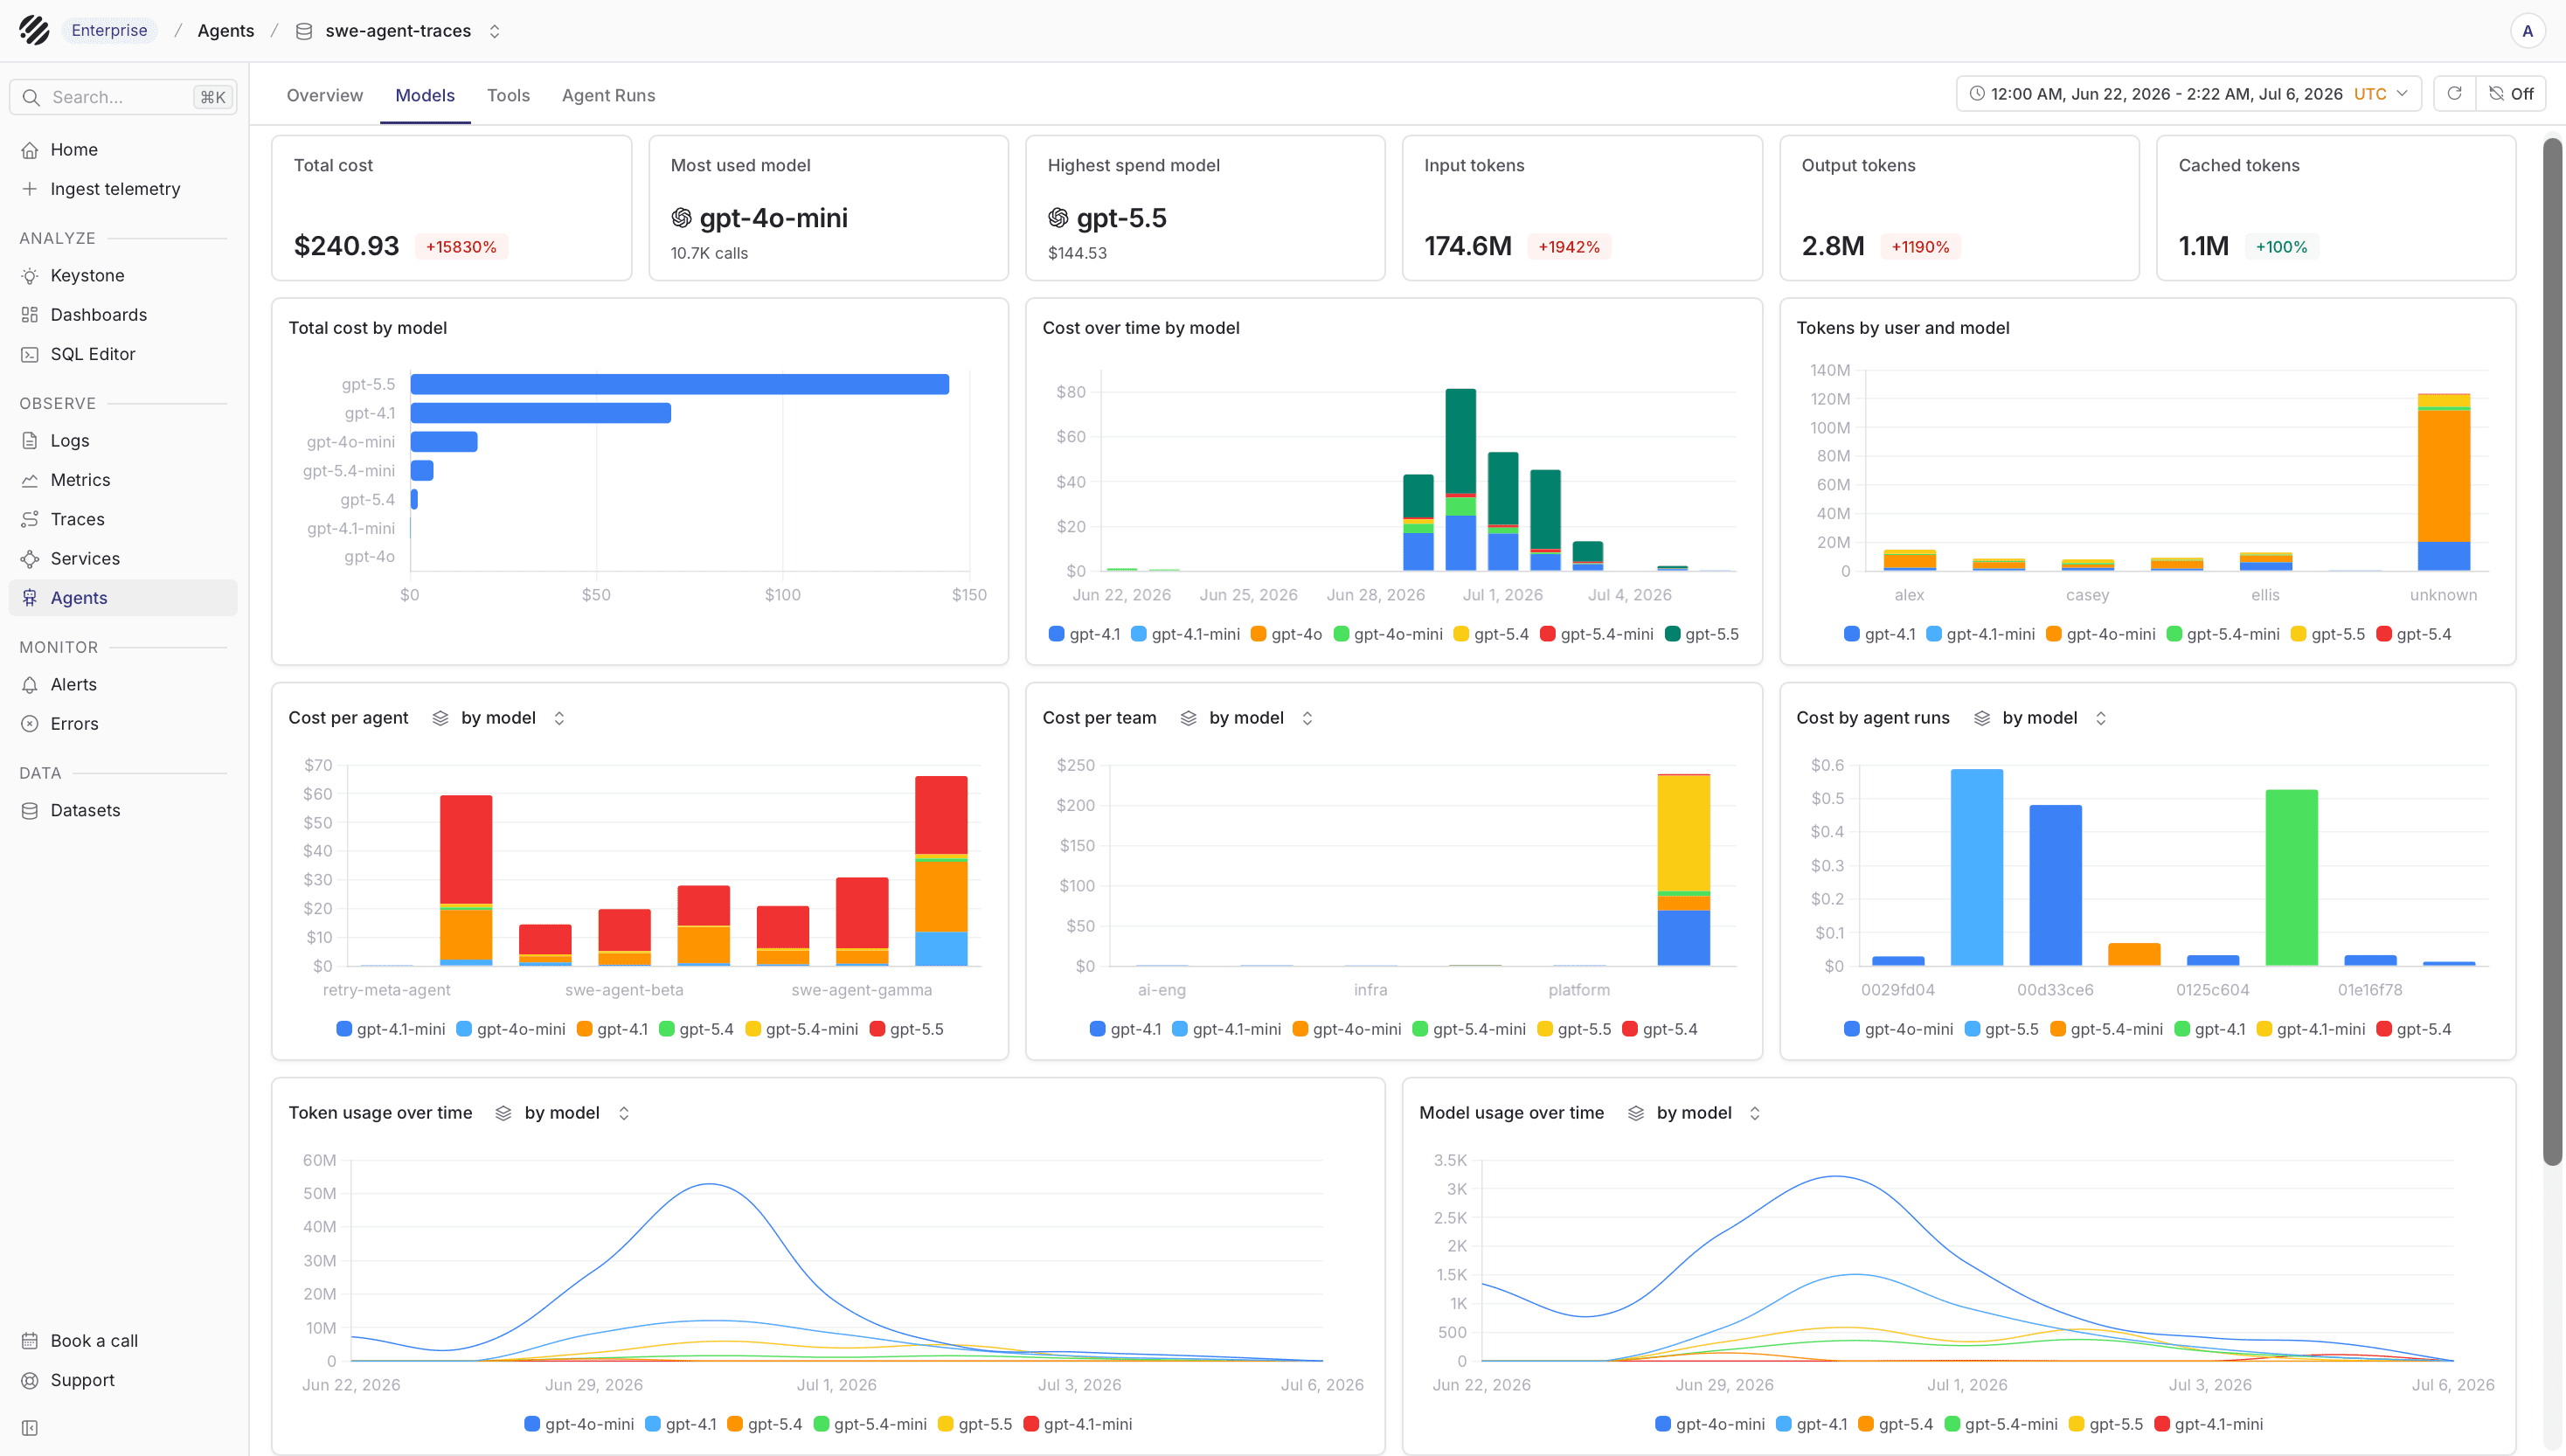
The Models tab is for understanding model behavior. Use it when you want to answer questions like: which model is used most, which model is the most expensive, where are tokens being spent, and whether a model is getting slower over time.
The top cards show total cost, most used model, highest spend model, input tokens, output tokens, and cached tokens. This gives you a quick model-level summary before you inspect the charts.
The charts let you compare total cost by model, cost over time by model, tokens by user and model, cost per agent, cost per team, cost by agent run, token usage over time, and model usage over time. This helps you see whether a cost spike came from a model switch, a specific user, a team, or a small number of expensive agent runs.
Tools
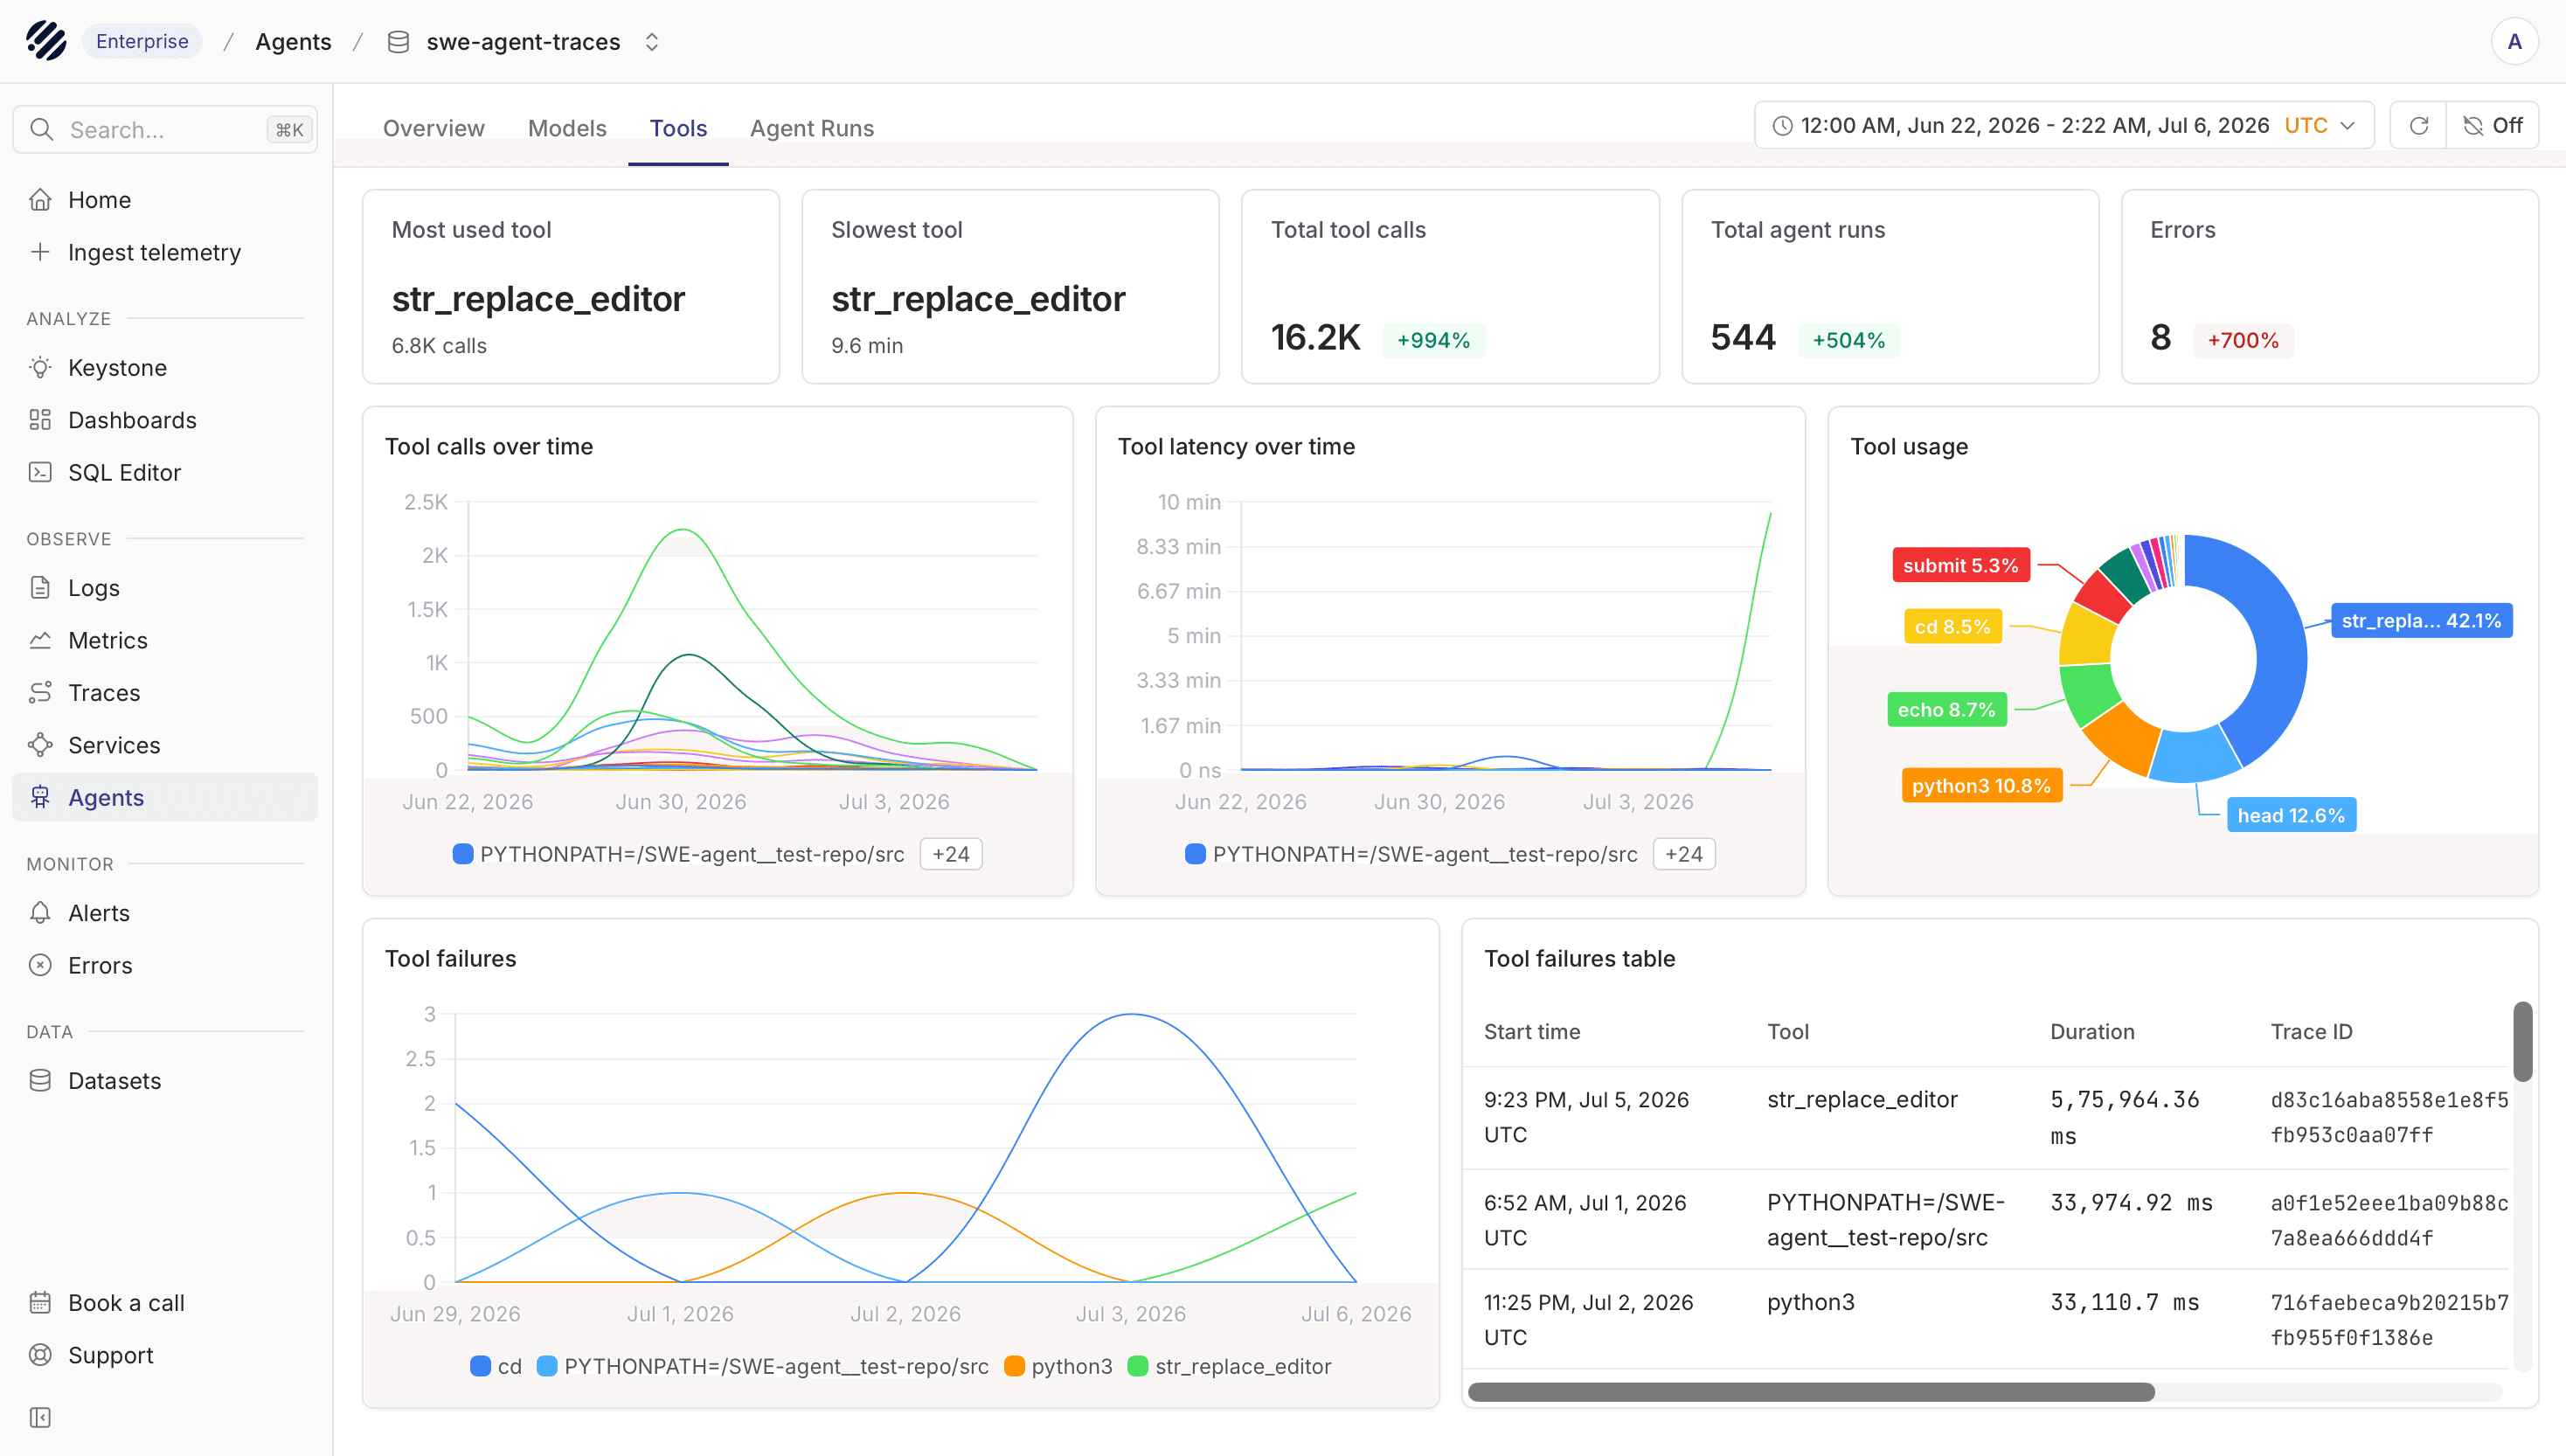
The Tools tab helps you understand how the agent interacts with the outside world. This matters because many agent failures are not model failures. They happen when a tool is slow, returns unexpected output, fails repeatedly, or gets called too often.
The top cards show the most used tool, slowest tool, total tool calls, total agent runs, and errors. The charts below show tool calls over time, tool latency over time, tool usage, and tool failures.
The tool failures table gives you a path back to the run that failed. It includes the start time, tool name, duration, and trace ID, so you can move from a failing tool trend to the exact trace that explains it.
Agent Runs
The Agent Runs tab is where you move from charts to individual runs. Use it when you need to inspect a specific prompt, a failed run, an expensive run, or a run that called too many tools.
The timeline at the top shows when runs happened. The table below lists each run with date, prompt, model, tokens, cost, duration, and operations. Operations show how many model interactions and tool calls happened inside the run, including failed tool calls when they exist.
Use Add filter to narrow the table when you already know what kind of run you are looking for. You can filter by fields such as model, tool, token counts, duration, errors, and other captured attributes. Use Find in data when you want to search within the currently visible results.
When you open a run, Parseable shows the trace behind it. User-facing input appears as user messages in the UI. Model or agent output appears as agent messages. Under the hood, keep this telemetry native to OpenTelemetry by recording message content with gen_ai.input.messages, gen_ai.output.messages, and gen_ai.client.inference.operation.details rather than relying on custom message event names.
Instrument agents with supported frameworks
Parseable supports Agent Observability for multiple agent frameworks and instrumentation libraries. The exact setup depends on the framework, but the data path is the same: capture agent, model, and tool telemetry, export it through OpenTelemetry, and send the trace dataset to Parseable with the agent-observability dataset tag.
At a high level, the flow looks like this:
Supported agent framework
  |
  | OpenTelemetry traces
  v
OpenTelemetry Collector
  |
  v
Parseable traces dataset
  |
  v
Agents page in Prism
Start with the guide for your framework:
| Framework guide | What it covers | Framework guide | What it covers |
|---|---|---|---|
| Pydantic AI | Agent, model, and tool-call traces | CrewAI | Crews, agents, tasks, LLM calls, and errors |
| Restate | Durable agent runs, model calls, tools, retries, and recovery | n8n | Workflow automation traces and related telemetry |
| Mastra | Agent logs, traces, and metrics | Hermes Agent | Agent invocations, token usage, model calls, tools, logs, and metrics |
| OpenLIT | Agent, workflow, tool, and model telemetry | LangChain | LangChain application traces |
| LlamaIndex | Retrieval and generation workflow traces | AutoGen | Multi-agent conversations and failures |
| DSPy | DSPy programs and prompt optimization workflows |
After choosing a framework guide, use the collector or direct OTLP export options below to send the resulting traces to Parseable.
Framework support matrix
Agent Observability is framework-aware when the incoming traces include agent, model, and tool attributes. Some frameworks emit those attributes directly. Others use instrumentation libraries such as OpenLIT or OpenInference to translate framework activity into OpenTelemetry spans.
| Path | Status |
|---|---|
| Supported agent framework guide | Recommended |
| OpenTelemetry Collector export | Recommended for production |
| Direct OTLP export to Parseable | Useful for small or local setups |
Collector configuration
After instrumentation is in place, the next step is deciding how you want to send the trace data to Parseable. For most teams, an OpenTelemetry Collector is the better default because it gives you batching and a more reliable path. If your setup is small, you can also export directly from the application.
OpenTelemetry Collector (Recommended)
Put an OpenTelemetry Collector between your application and Parseable when you want a cleaner and more production-friendly path for export. Save the following as parseable-genai-collector.yaml:
receivers:
  otlp:
    protocols:
      grpc:
        endpoint: 0.0.0.0:4317
      http:
        endpoint: 0.0.0.0:4318

processors:
  batch:
    timeout: 5s
    send_batch_size: 256

exporters:
  otlphttp/parseable:
    endpoint: ${PARSEABLE_URL}
    encoding: json
    headers:
      Authorization: "Bearer ${PARSEABLE_API_KEY}"
      X-P-Stream: "${STREAM_NAME}"
      X-P-Dataset-Tag: "agent-observability"

service:
  pipelines:
    traces:
      receivers: [otlp]
      processors: [batch]
      exporters: [otlphttp/parseable]
Run the collector:
export PARSEABLE_URL=${PARSEABLE_URL}          # e.g. https://ingest.parseable.com
export PARSEABLE_API_KEY=${PARSEABLE_API_KEY}
export STREAM_NAME=${PARSEABLE_DATASET_NAME}

otelcol-contrib --config parseable-genai-collector.yaml
Direct to Parseable
For smaller setups, you can send traces directly from the application to Parseable with OTLP environment variables. This avoids running a separate collector process.
export OTEL_EXPORTER_OTLP_ENDPOINT=${PARSEABLE_URL}
export OTEL_EXPORTER_OTLP_HEADERS="Authorization=Bearer ${PARSEABLE_API_KEY},X-P-Stream=${PARSEABLE_DATASET_NAME},X-P-Dataset-Tag=agent-observability"
export OTEL_SERVICE_NAME=my-agent
export OTEL_INSTRUMENTATION_GENAI_CAPTURE_MESSAGE_CONTENT=true
SQL query templates
The Agents page should be the first place you inspect agent behavior. When you need to go deeper, you can query the same traces dataset directly with SQL. The examples below assume a dataset named genai-traces. Replace it with your dataset name if you use something different.
Span rows have event_name IS NULL. Most analytics queries should include this filter so span data is not mixed with event rows that carry prompt, completion, or other event-level content.
LLM call summary
Use this when you want a quick per-model view of call volume, token usage, latency, and errors over the last 24 hours.
SELECT
    "gen_ai.request.model" AS model,
    COUNT(*) AS call_count,
    SUM("gen_ai.usage.input_tokens") AS total_input_tokens,
    SUM("gen_ai.usage.output_tokens") AS total_output_tokens,
    SUM(p_genai_tokens_total) AS total_tokens,
    ROUND(AVG(p_genai_duration_ms), 2) AS avg_latency_ms,
    ROUND(100.0 * SUM(CASE WHEN span_status_code = 2 THEN 1 ELSE 0 END) / COUNT(*), 2) AS error_rate_pct
FROM "genai-traces"
WHERE p_timestamp > NOW() - INTERVAL '24 hours'
    AND event_name IS NULL
    AND "gen_ai.operation.name" = 'chat'
GROUP BY "gen_ai.request.model"
ORDER BY total_tokens DESC;
Reconstruct an agent run
Use this after you find a trace ID in the Agent Runs table. It lists the spans in that run in the order they happened.
SELECT
    span_name,
    "gen_ai.operation.name" AS operation,
    ROUND(p_genai_duration_ms, 2) AS duration_ms,
    "gen_ai.usage.input_tokens" AS input_tokens,
    "gen_ai.usage.output_tokens" AS output_tokens,
    span_status_description AS status,
    span_parent_span_id
FROM "genai-traces"
WHERE span_trace_id = '<TRACE_ID>'
    AND event_name IS NULL
ORDER BY span_start_time_unix_nano;
Token usage over time
Use this to see hourly token consumption by model over the last 7 days.
SELECT
    DATE_TRUNC('hour', p_timestamp) AS hour,
    "gen_ai.request.model" AS model,
    SUM("gen_ai.usage.input_tokens") AS input_tokens,
    SUM("gen_ai.usage.output_tokens") AS output_tokens,
    SUM(p_genai_tokens_total) AS total_tokens
FROM "genai-traces"
WHERE p_timestamp > NOW() - INTERVAL '7 days'
    AND event_name IS NULL
    AND "gen_ai.usage.input_tokens" IS NOT NULL
GROUP BY hour, "gen_ai.request.model"
ORDER BY hour DESC, total_tokens DESC;
Tool usage
Use this to understand which tools are called most often, how long they take, and how often they fail.
SELECT
    "gen_ai.tool.name" AS tool,
    COUNT(*) AS invocations,
    ROUND(AVG(p_genai_duration_ms), 2) AS avg_duration_ms,
    ROUND(100.0 * SUM(CASE WHEN span_status_code = 2 THEN 1 ELSE 0 END) / COUNT(*), 2) AS failure_rate_pct
FROM "genai-traces"
WHERE "gen_ai.operation.name" = 'execute_tool'
    AND p_timestamp > NOW() - INTERVAL '24 hours'
    AND event_name IS NULL
GROUP BY "gen_ai.tool.name"
ORDER BY invocations DESC;
Recent errors
Use this when you want the latest failing model calls, tool calls, or agent spans.
SELECT
    p_timestamp,
    "gen_ai.request.model" AS model,
    "gen_ai.operation.name" AS operation,
    span_status_message AS error_message,
    span_trace_id,
    span_span_id,
    "gen_ai.agent.name" AS agent
FROM "genai-traces"
WHERE span_status_code = 2
    AND event_name IS NULL
    AND p_timestamp > NOW() - INTERVAL '24 hours'
ORDER BY p_timestamp DESC
LIMIT 50;
Model comparison
Use this to compare models by latency, throughput, and token usage over the last 7 days.
SELECT
    "gen_ai.request.model" AS model,
    COUNT(*) AS calls,
    ROUND(AVG(p_genai_duration_ms), 2) AS avg_latency_ms,
    ROUND(PERCENTILE_CONT(0.95) WITHIN GROUP (ORDER BY p_genai_duration_ms), 2) AS p95_latency_ms,
    ROUND(AVG(p_genai_tokens_per_sec), 2) AS avg_tokens_per_sec,
    SUM(p_genai_tokens_total) AS total_tokens
FROM "genai-traces"
WHERE event_name IS NULL
    AND "gen_ai.operation.name" = 'chat'
    AND p_timestamp > NOW() - INTERVAL '7 days'
GROUP BY "gen_ai.request.model"
ORDER BY total_tokens DESC;
Was this page helpful?